
Bottle gourd farming has gained popularity among home gardeners and small-scale farmers in tropical and subtropical regions. Learning how to grow bottle gourd (Lagenaria siceraria) provides an opportunity to cultivate a versatile vegetable that offers numerous culinary and nutritional benefits. This climbing vine produces elongated fruits that have been part of traditional diets for centuries.
Known locally as upo in the Philippines, calabash in many English-speaking countries, and lauki in India, this versatile gourd adapts well to various growing conditions. The plant develops extensive vines that can reach impressive lengths when properly supported. Its large white flowers bloom at night, creating a beautiful display while attracting nocturnal pollinators.
Bottle gourd stands out for its mild flavor that readily absorbs the tastes of ingredients it’s cooked with. The young, tender fruits offer the best texture and taste for culinary purposes. When harvested young, the flesh remains soft and the skin tender enough for easy preparation.
Beyond their culinary uses, mature dried gourds have historically served as containers, musical instruments, and decorative items. This dual-purpose nature makes growing bottle gourds particularly rewarding. Some cultures also utilize the tender vine tips and young leaves as vegetables, maximizing the plant’s utility.
This guide will walk you through everything you need to grow healthy, productive bottle gourd plants in your garden or containers. From seed selection to harvest, you’ll learn the techniques that lead to gardening success with this remarkable vine.
Understanding Bottle Gourd Varieties
Before starting your bottle gourd-growing journey, it’s important to understand the different varieties available. While all belong to the same species (Lagenaria siceraria), several distinct cultivars offer different shapes, sizes, and growth habits.
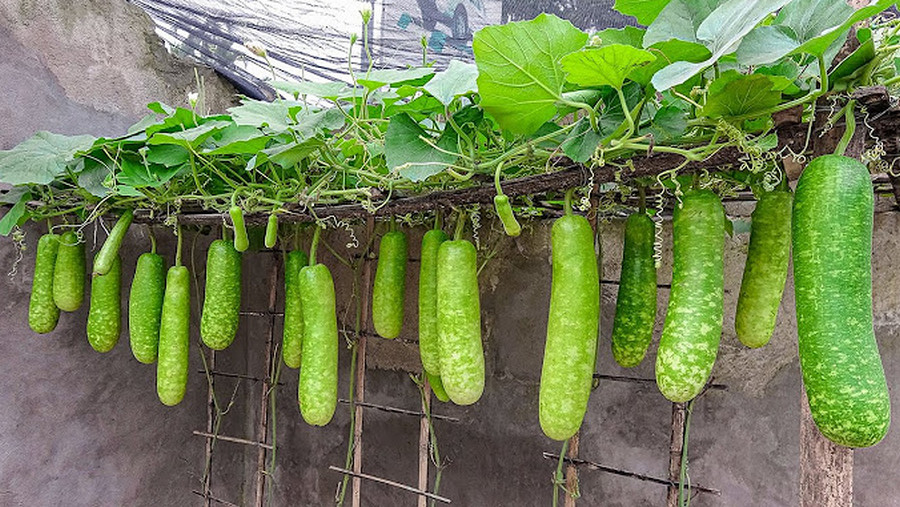
Long varieties produce cylindrical fruits that can reach 1-3 feet in length. These remain the most common type for culinary purposes across Asia. The elongated shape makes them ideal for slicing into rings or cubes for various dishes. ‘Long Green’ and ‘Cucuzzi’ represent popular cultivars in this category.
Round or oval varieties develop more bulbous fruits resembling large apples or small pumpkins. These types often find use in dishes requiring stuffing or as decorative items when dried. ‘Basket Ball’ and ‘Apple Gourd’ exemplify this type, with fruits typically 6-10 inches in diameter.
Miniature bottle gourd varieties have gained popularity for container gardening. These compact plants produce smaller fruits while requiring less space. The ‘Mini Bottle’ cultivar grows well in pots and produces 6-8 inch fruits perfect for small households.
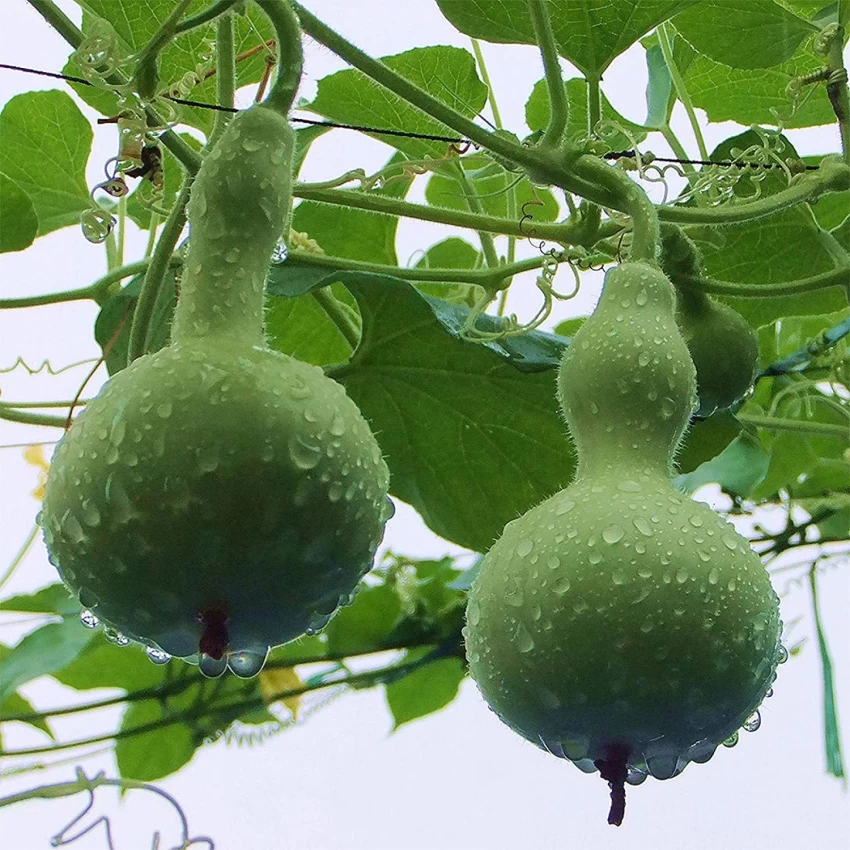
Ornamental varieties focus more on distinctive shapes for crafting rather than culinary uses. The classic ‘Birdhouse’ gourd develops a bulbous bottom with a narrower neck, perfect for creating decorative items when dried. While edible when young, these varieties often develop thicker skins and fibrous flesh earlier.
Regional varieties have evolved to suit specific growing conditions and culinary preferences around the world. In the Philippines, varieties selected for tropical conditions produce well during wet seasons and resist common diseases. Indian varieties often emphasize tender flesh and thinner skins for specific traditional dishes.
How to Grow Bottle Gourd from Seed
How to grow bottle gourd from seed successfully begins with obtaining quality seeds. You can purchase seeds from garden centers, agricultural supply stores, or reputable online retailers. For heirloom varieties, seed exchanges or local farmers markets often provide good sources.
How to get bottle gourd seeds from existing fruits requires careful selection and processing. Choose fully mature gourds from healthy, productive plants. Allow the gourd to dry completely, then cut it open and remove the seeds. Wash them thoroughly to remove pulp, then dry them on paper towels for several days before storing in a cool, dry place.
Begin by preparing the seeds for optimal germination. Bottle gourd seeds have hard seed coats that benefit from scarification. Gently file one edge of each seed with a nail file or sandpaper, or nick it carefully with a knife. This helps water penetrate the seed coat for faster, more uniform germination.
Pre-soaking the prepared seeds for 12-24 hours before planting further improves germination rates. Use room temperature water and discard any seeds that float, as these are likely non-viable. After soaking, drain the seeds and plant immediately.
Depending on your climate, you can either direct-sow seeds outdoors or start them indoors. In warm regions with long growing seasons, direct sowing works well. In cooler areas, start seeds indoors 3-4 weeks before the last expected frost to extend the growing season.
Plant seeds 1 inch deep, spacing them according to your chosen growing method. For direct ground planting, create hills 3-4 feet apart and plant 2-3 seeds per hill. For transplants, use biodegradable pots to minimize root disturbance when moving plants outdoors.
Site Selection and Preparation
Choosing the right location significantly impacts how successful your bottle gourd plants will grow. These heat-loving vines thrive in full sun positions receiving at least 6-8 hours of direct sunlight daily. In very hot climates, afternoon shade can prevent heat stress during the hottest months.
Bottle gourd growing time extends throughout the warm season, so select a site that will remain suitable for several months. These sprawling vines need space—plan for at least 50-100 square feet per plant if growing along the ground. Trellised plants require less horizontal space but need strong vertical supports.
Prepare the soil thoroughly before planting. Bottle gourds prefer well-draining, fertile loam with plenty of organic matter. Work compost or well-rotted manure into the top 12 inches of soil to improve both drainage and fertility. These heavy feeders benefit from rich soil preparation.
Create planting hills or raised rows to ensure good drainage, particularly in areas with heavy clay soils or high rainfall. Hills should be about 12 inches high and 24 inches in diameter. Space them 3-4 feet apart for bush varieties or 6-8 feet apart for vigorous vining types.
Install trellises or support structures before planting to avoid disturbing roots later. Strong supports capable of bearing the considerable weight of mature fruits are essential. Options include sturdy wooden trellises, wire cattle panels, or fence installations with reinforced posts.
Test soil pH and adjust if necessary. Bottle gourds prefer slightly acidic to neutral soil with pH between 6.0-7.0. Add agricultural lime to raise pH or sulfur to lower it according to test results. These adjustments should be made several weeks before planting.
How to Plant Bottle Gourd Successfully
How to plant bottle gourd properly begins with timing. Wait until soil temperatures reach at least 65°F (18°C) and all danger of frost has passed. Bottle gourd planting season typically runs from late spring through early summer in most growing regions.
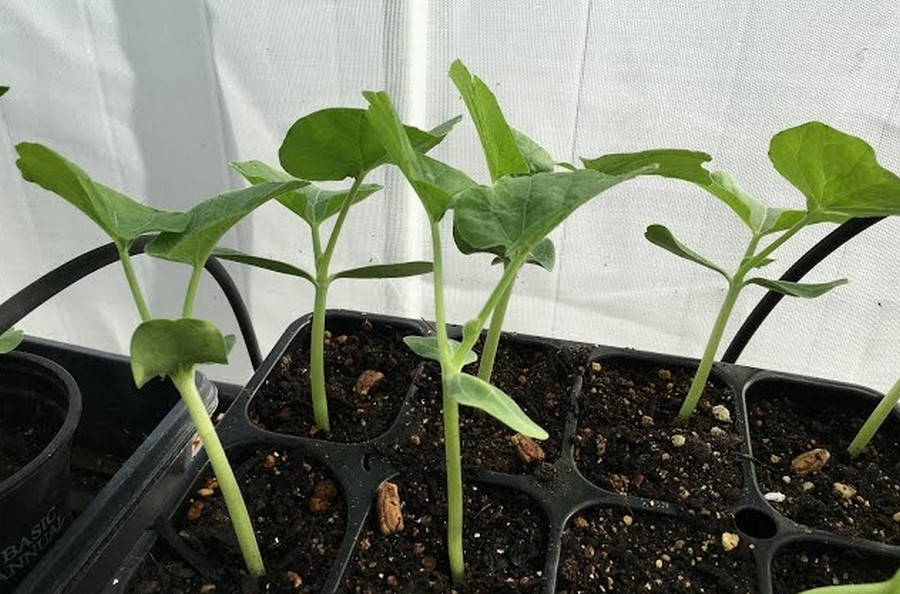
For direct sowing, plant seeds 1 inch deep and 2-3 per hill. Once seedlings reach 3-4 inches tall with true leaves, thin to the strongest plant per hill. For transplants, harden them off gradually by exposing them to outdoor conditions for increasing periods over 7-10 days before planting.
Dig holes twice the size of the root ball for transplants. Set plants at the same depth they grew in containers, being careful not to disturb roots. Water thoroughly after planting to settle soil around roots and eliminate air pockets.
Space plants according to your growing method. For ground cultivation, allow 6-8 feet between plants. Trellised plants can be spaced closer at 3-4 feet apart. Bush varieties need about 3-4 feet of space in all directions.
Add a layer of mulch around plants once they’re established. Organic mulches like straw, dried leaves, or wood chips help conserve moisture, suppress weeds, and maintain even soil temperatures. Keep mulch a few inches away from stems to prevent rot.
For optimal pollination, consider planting in blocks rather than single rows when growing multiple plants. This arrangement improves cross-pollination opportunities, which is especially important since bottle gourds produce separate male and female flowers on the same plant.
Support Systems for Climbing Vines
Bottle gourd plants develop extensive vines that benefit from proper support systems. Without support, vines sprawl across the ground, taking up substantial space and increasing disease risk as fruits contact soil. Well-designed trellises maximize space efficiency and fruit quality.
Strong, durable structures are essential as mature plants with fruits become quite heavy. T-posts with heavy-gauge wire, sturdy wooden frames, or metal cattle panels secured to posts all work well. The support should reach at least 6-8 feet high to accommodate the plant’s growth.
For home gardeners wondering how to grow bottle gourd at home with limited space, vertical growing provides an excellent solution. Arches and arbors not only support plants but create attractive garden features. As vines cover these structures, they provide shade beneath, potentially creating space for cool-season crops.
Train young vines to climb supports by gently guiding them toward the structure. The plant’s tendrils will wrap around supporting materials once they make contact. During early growth, you may need to secure vines to supports using soft garden ties or strips of cloth.
For heavier fruits, provide additional support using cloth slings or net bags attached to the trellis. This prevents fruit weight from damaging vines or causing fruits to drop prematurely. Slings should cradle fruits while allowing them to continue growing and developing.
Some growers use a combination of vertical and horizontal supports, creating a tunnel or canopy effect. This method maximizes airflow around plants while making harvesting more accessible. It also creates charming garden structures that enhance landscape aesthetics.
Water and Fertilizer Requirements
Consistent moisture proves crucial for successfully growing bottle gourds. These plants develop extensive, water-hungry root systems and large leaves that transpire significant moisture. Water deeply when the top inch of soil feels dry, typically 1-2 times weekly depending on weather conditions.
Drip irrigation or soaker hoses deliver water efficiently directly to the root zone. This method reduces disease risk by keeping foliage dry while conserving water. Apply water in the morning to allow any splashed leaves to dry before evening, further reducing disease problems.
How to care bottle gourd plant properly includes appropriate fertilization throughout the growing season. Start with pre-planting soil enrichment using compost or balanced organic fertilizer. Once plants begin flowering, transition to formulations with less nitrogen and more phosphorus and potassium to encourage fruit development.
Apply fertilizer every 3-4 weeks throughout the growing season. Organic options like compost tea, fish emulsion, or well-rotted manure work excellently. If using chemical fertilizers, follow package directions carefully to avoid overapplication that can damage plants.
Foliar feeding with seaweed extract or compost tea every 2-3 weeks during the growing season provides micronutrients and growth stimulants. Apply these sprays early in the morning or late afternoon when temperatures are cooler and leaves absorb nutrients more efficiently.
Mulching helps maintain consistent soil moisture and temperature while slowly adding nutrients as organic mulches decompose. Replenish mulch as needed throughout the season to maintain a 2-3 inch layer. This also suppresses weeds that would compete for water and nutrients.
How to Grow Bottle Gourd in Pots
How to grow bottle gourd in pots offers solutions for gardeners with limited space. While these plants naturally spread widely, container cultivation remains possible with proper planning and care. Select compact or bush varieties when possible for best results in containers.
Choose large containers with at least 10-15 gallon capacity per plant. Half barrels, large grow bags, or dedicated vegetable containers work well. Ensure excellent drainage with multiple drainage holes in the container bottom to prevent waterlogging.
Use high-quality potting mix rather than garden soil in containers. Commercial vegetable mixes or equal parts potting soil, compost, and perlite create good growing media. The lighter weight improves drainage while providing necessary nutrients.
Position containers where they receive full sun (at least 6-8 hours daily) and can access strong support structures. South or west-facing locations generally provide the best sun exposure. Ensure containers remain stable as plants grow and become heavier.
Install support systems at planting time to avoid root disturbance later. Secure trellises, cages, or stakes directly to containers when possible, or place containers near existing structures like fences or pergolas that vines can climb.
Water more frequently than ground-planted gourds, as containers dry out faster. Check moisture levels daily during hot weather, as potted plants may need watering once or twice daily during peak summer heat. Always water until excess flows from drainage holes.
How to Grow Bottle Gourd in Terrace
How to grow bottle gourd in terrace gardens provides urban dwellers access to this nutritious vegetable. Terrace growing presents unique challenges including weight considerations, wind exposure, and possibly limited space, but yields rewarding results with proper planning.
Begin by assessing your terrace’s weight-bearing capacity. Filled containers, soil, plants, and water add significant weight. If uncertain about structural limitations, consult a building professional. Position heavy containers near load-bearing walls rather than at terrace centers.
Choose appropriate containers as described in the container section. On windy terraces, wider, heavier containers provide better stability. Alternatively, secure containers to prevent tipping as plants grow top-heavy with foliage and fruits.
Create windbreaks if your terrace experiences strong breezes. Temporary barriers of canvas or plastic sheeting protect young plants until established. Orient trellises to minimize wind resistance or use the building wall itself as a growing surface where permitted.
Install efficient irrigation systems to maintain consistent moisture. Self-watering containers or drip irrigation on timers ensure plants receive adequate water even during hot periods. Avoid overhead watering in terrace settings, as splashing can affect neighbors below.
Maximize vertical space by training vines upward on trellises, arbors, or pergolas. This vertical growth not only conserves space but potentially creates pleasant shaded areas on the terrace. Some growers create “green walls” by training vines across wire mesh attached to terrace railings.
How to Grow Bottle Gourd Indoors
How to grow bottle gourd indoors presents challenges but remains possible with dedication and proper setup. Indoor cultivation allows growing these tropical plants in cooler climates or year-round production in appropriate conditions. Compact or bush varieties work best for indoor growing.
Select a location receiving maximum natural light, ideally south-facing windows that provide 6+ hours of direct sunlight daily. In most cases, supplemental lighting becomes necessary. Use full-spectrum grow lights positioned 12-18 inches above plants and run them 12-14 hours daily.
Choose containers sized appropriately for indoor spaces while still providing adequate root volume. Five-gallon containers represent the minimum size for productive plants. Ensure excellent drainage and use saucers to protect indoor surfaces from water damage.
Maintain indoor temperatures between 70-85°F (21-29°C) during the day and not below 60°F (15°C) at night. Avoid placing plants near heating vents, air conditioners, or drafty areas that create temperature fluctuations or low humidity.
Hand-pollination becomes essential for indoor plants without natural pollinators. Using a small brush, transfer pollen from male flowers (thin stems, no small fruit behind flower) to female flowers (with tiny fruit forming behind blossoms). Pollinate in early morning when flowers are fully open.
Monitor humidity levels as indoor environments often lack the moisture bottle gourds prefer. Use humidifiers, pebble trays with water, or group plants together to increase local humidity. Avoid misting leaves, which can promote fungal diseases in still indoor air.
Pest and Disease Management
Vigilant monitoring helps identify and address pest and disease issues before they become serious problems. Regular inspection of both leaf surfaces, stems, and developing fruits allows early intervention that preserves plant health and productivity.
Common insect pests affecting bottle gourds include aphids, squash bugs, cucumber beetles, and spider mites. Introduce beneficial insects like ladybugs or lacewings for biological control. Insecticidal soaps or neem oil applications control many soft-bodied pests while being less harmful to beneficial insects.
Powdery mildew appears as white powdery spots on leaves, especially during humid weather or when foliage remains wet overnight. Improve air circulation by proper spacing and trellising. Remove and destroy affected leaves. Organic fungicides containing potassium bicarbonate or sulfur treat existing infections.
Downy mildew causes yellow patches on leaf tops with gray fuzzy growth underneath. This disease spreads rapidly in wet, cool conditions. Prevent by watering at soil level in morning hours. Copper-based fungicides applied at first signs help control spread.
Bacterial wilt causes sudden wilting of vines that doesn’t recover with watering. Since cucumber beetles spread this disease, controlling these insects represents the best prevention. Once plants show symptoms, remove and destroy affected vines promptly to prevent spread.
Fruit rot often occurs where fruits contact soil. Trellising plants and supporting fruits with slings prevents this issue. Avoid wounding fruits during harvest or cultivation, as injuries provide entry points for rot-causing organisms.
Growing Timeline and Harvest
Understanding bottle gourd growing time helps plan your garden properly. From planting to first harvest typically takes 75-90 days depending on variety and growing conditions. The total bottle gourd plant lifespan extends 4-5 months in most climates before declining productivity.
How long does bottle gourd take to grow from seedling to first harvest? Seedlings emerge 5-10 days after planting under warm conditions. Vines grow vigorously for 30-40 days before flowering begins. The first female flowers appear 45-60 days after planting, with fruits ready for harvest 2-3 weeks after successful pollination.
Bottle gourd yield per plant varies widely based on growing conditions, variety, and care. Under optimal conditions, each plant produces 8-15 marketable fruits throughout the growing season. Trellised plants with excellent care may yield on the higher end of this range.
Harvest young fruits when they reach 8-12 inches for most culinary purposes. The skin should still have a slight shine and yield slightly to thumb pressure. Use sharp pruners or a knife to cut fruits from vines, leaving a short stem attached. Pulling fruits risks damaging vines.
Continue harvesting regularly to encourage continued production. Leaving mature fruits on vines signals the plant to reduce new flower and fruit development. Checking vines every 2-3 days during peak production ensures timely harvest of fruits at optimal size.
For dried gourds intended for crafts or containers, allow fruits to mature fully on the vine until stems turn brown. Leave them on vines as long as possible before frost threatens. After harvest, cure them in a well-ventilated area for several months until completely dry and lightweight.
Frequently Asked Questions
1. When is the best time to plant bottle gourd?
Plant when soil temperatures reach at least 65°F (18°C) and all danger of frost has passed. In tropical regions, planting at the beginning of the rainy season works well. In temperate areas, late spring to early summer provides ideal conditions.
2. Why are my bottle gourd plants flowering but not producing fruits?
This typically results from pollination issues, as bottle gourds produce separate male and female flowers on the same plant. Poor pollinator activity, extreme temperatures above 90°F (32°C) or below 60°F (15°C) during flowering, or excessive nitrogen fertilizer can all cause this problem. Hand-pollinating flowers in early morning improves fruit set.
3. How do I distinguish male from female flowers?
Male flowers grow on long, thin stems and appear in clusters. Female flowers have a small, undeveloped fruit (ovary) at the base of the flower and usually grow singly on thicker stems. Both flower types are large and white, blooming primarily in evening and night.
4. Can I grow bottle gourds in cold climates?
Yes, though the growing season must provide at least 100 frost-free days. In cooler regions, start seeds indoors 3-4 weeks before the last frost, use black plastic mulch to warm soil, and choose faster-maturing varieties. Season-extension techniques like row covers or small hoop houses also help.
5. Why are my young bottle gourd fruits rotting on the vine?
This usually indicates incomplete pollination or environmental stress. Ensure proper pollination by hand-pollinating if necessary. Maintain consistent soil moisture without overwatering, and ensure plants receive adequate calcium through balanced fertilization to prevent blossom end rot.
6. How many bottle gourd plants do I need for a family?
For most families, 2-3 healthy plants provide sufficient harvest throughout the season. Each plant typically yields 8-15 fruits, with continuous production for several months in proper conditions. Space requirements and your consumption habits should guide your planting quantity.
7. Can I save seeds from my bottle gourds for next season?
Yes, allow selected fruits to mature fully on the vine until the outer skin hardens. Harvest after the stem dries but before frost, then store whole gourds in a cool, dry place for 2-3 months. Extract seeds, wash them thoroughly to remove pulp, and dry them completely before storing them in a cool, dry location.
8. Are bottle gourd leaves edible?
Yes, young tender leaves and shoot tips are edible and are commonly used in some Asian cuisines. Harvest young leaves and cook thoroughly before eating. Mature leaves become bitter and tough, making them less palatable.
9. How do I prevent my bottle gourd vines from taking over the garden?
Train vines vertically on strong trellises, arbors, or fences to contain their spread. Regular pruning of lateral vines helps control growth. Remove any runners heading in unwanted directions, and consider growing bush varieties if space is very limited.
10. What causes a bitter taste in bottle gourds?
Bitterness indicates the presence of cucurbitacins, compounds that can be toxic in high concentrations. Environmental stress, cross-pollination with wild gourds, or genetic factors can cause bitterness. Never consume bitter-tasting gourds, as they may cause illness. Discard bitter fruits and their seeds.
Conclusion
Learning how to grow bottle gourd rewards gardeners with a versatile, productive vegetable that offers numerous culinary possibilities. These vigorous vines produce abundantly throughout the warm season with proper care and attention to their basic needs.
Success begins with understanding the plant’s requirements: warm temperatures, consistent moisture, rich soil, strong support structures, and adequate space for growth. Meeting these needs leads to healthy plants that resist most problems while producing quality fruits.
Whether grown in garden beds, containers, or indoor settings, bottle gourds adapt well to various growing methods. This flexibility makes them accessible to gardeners with different space limitations and growing conditions. From sprawling country gardens to urban terraces, bottle gourds find their place.
The satisfaction of growing your own bottle gourds extends beyond the garden. These nutritious vegetables transition beautifully from garden to kitchen, offering multiple culinary possibilities from simple sautés to complex stuffed preparations. Their mild flavor complements many different cuisines.
With the techniques shared in this guide, you have the knowledge needed for successful bottle gourd cultivation. Experiment with different varieties and growing methods to discover what works best in your specific conditions, and enjoy the rewards of this ancient yet still-relevant crop.
See Also: